Showing posts with label automatic. Show all posts
Showing posts with label automatic. Show all posts
Sunday, October 23, 2016
PESTISIDES DOSING WITH AUTOMATIC PLANT IRRIGATION FOR AGRICULTURE APPLICATIONS
PESTISIDES DOSING WITH AUTOMATIC PLANT IRRIGATION FOR AGRICULTURE APPLICATIONS
Abstract:
Indian agriculture is dependent on the monsoons which is not a reliable source of water. Therefore there is a need for an irrigation system in the country which can provide water to the farms according to their soil types. This paper presents the prototype design of microcontroller based automatic irrigation system which will allow irrigation to take place in zones where watering is required, there by supplying required quantity of water depending on the soil moisture indicated by different plants. Thus different plants grown can be supplied with single source of water automatically, which requires no human control.
The use of pesticides sprinkling system in this project makes an added advantage to the irrigation system by sprinkling the pesticide mixture in required proportion to the plants once in a minute. Here, switches are used for giving an input ratio by which the pesticide and water are supplied to plants.
This project uses AT89S52 Microcontroller as its controller.
This project uses regulated 5v, 750mA power supply. 7805, a three terminal voltage regulator is used for voltage regulation. Bridge type full wave rectifier is used to rectify the ac output of secondary of 230/12v step down transformer.

If you want to buy this project, drop email on technofieldsystems@gmail.com
Available link for download

Tuesday, September 27, 2016
Solar Charger Circuit using Transistors with Automatic Cut off
Solar Charger Circuit using Transistors with Automatic Cut off
The post details a simple solar charger circuit with automatic cut-off using transistors only. The idea was requested by Mr. Mubarak Idris.
The Request
Please sir can you make me a 12v, 28.8AH lithium ion battery,automatic charge controller using solar panel as a supply, which is 17v at 4.5A at max sun light please sir its urgent thanks in advance, and the charge controller should be able to have over charge protection and low battery cut off and please sir the circuit should be simple to do for beginner without ic or micro controller, please sir the circuit should use relay or bjt transistors as a switch and zener for voltage reference thanks sir hope to hear from you soon! and sorry to say that I am a student.thanks sir!
The Design
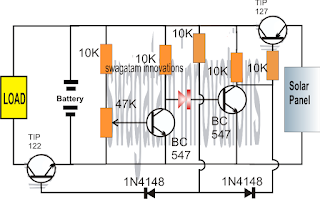
Referring to the above simple solar charger circuit using transistors, the automatic cut off for the full charge charge level and the lower level is done through a couple of BJTs configured as comparators.
Recall the earlier low battery indicator circuit using transistors, where the low battery level was indicated using just two transistors and a few other passive components.
Here we employ an identical design for the sensing of the battery levels and for enforcing the required switching of the battery across the solar panel and the connected load.
Lets assume initially we have a partially discharged battery which causes the first BC547 from left to stop conducting (this is set by adjusting the base preset to this threshold limit), and allows the next BC547 to conduct.
When this BC547 conducts it enable the TIP127 to switch ON, which in turn allows the solar panel voltage to reach the battery and begin charging it.
The above situation conversely keeps the TIP122 switched OFF so that the load is unable to operate.
As the battery begins getting charged, the voltage across the supply rails also begin rising until a point where the left side BC547 is just able to conduct, causing the right side BC547 to stop conducting any further.
As soon as this happens, the TIP127 is inhibited from the negative base signals and it gradually stops conducting such that the battery gradually gets cut off from the solar panel voltage.
However, the above situation permits the TIP122 to slowly receive a base biasing trigger and it begins conducting....which ensures that the load now is able to get the required supply for its operations.
The above explained solar charger circuit using transistors and with auto cut-offs can be used for any small scale solar controller applications such as for charging cellphone batteries or other forms of Li-ion batteries safely.
For getting a Regulated Charging Supply
The design can be easily modified for enabling a regulated fixed voltage supply for the battery, as shown below:

The TIP127 configuration in the above design looks incorrect, the correct version should be as indicated in the following diagram:

The Request
Please sir can you make me a 12v, 28.8AH lithium ion battery,automatic charge controller using solar panel as a supply, which is 17v at 4.5A at max sun light please sir its urgent thanks in advance, and the charge controller should be able to have over charge protection and low battery cut off and please sir the circuit should be simple to do for beginner without ic or micro controller, please sir the circuit should use relay or bjt transistors as a switch and zener for voltage reference thanks sir hope to hear from you soon! and sorry to say that I am a student.thanks sir!
The Design
Referring to the above simple solar charger circuit using transistors, the automatic cut off for the full charge charge level and the lower level is done through a couple of BJTs configured as comparators.
Recall the earlier low battery indicator circuit using transistors, where the low battery level was indicated using just two transistors and a few other passive components.
Here we employ an identical design for the sensing of the battery levels and for enforcing the required switching of the battery across the solar panel and the connected load.
Lets assume initially we have a partially discharged battery which causes the first BC547 from left to stop conducting (this is set by adjusting the base preset to this threshold limit), and allows the next BC547 to conduct.
When this BC547 conducts it enable the TIP127 to switch ON, which in turn allows the solar panel voltage to reach the battery and begin charging it.
The above situation conversely keeps the TIP122 switched OFF so that the load is unable to operate.
As the battery begins getting charged, the voltage across the supply rails also begin rising until a point where the left side BC547 is just able to conduct, causing the right side BC547 to stop conducting any further.
As soon as this happens, the TIP127 is inhibited from the negative base signals and it gradually stops conducting such that the battery gradually gets cut off from the solar panel voltage.
However, the above situation permits the TIP122 to slowly receive a base biasing trigger and it begins conducting....which ensures that the load now is able to get the required supply for its operations.
The above explained solar charger circuit using transistors and with auto cut-offs can be used for any small scale solar controller applications such as for charging cellphone batteries or other forms of Li-ion batteries safely.
For getting a Regulated Charging Supply
The design can be easily modified for enabling a regulated fixed voltage supply for the battery, as shown below:
The TIP127 configuration in the above design looks incorrect, the correct version should be as indicated in the following diagram:
Available link for download
Friday, September 23, 2016
Smart Automatic ON OFF Switch Using Arduino
Smart Automatic ON OFF Switch Using Arduino
In this article we are going to build a smart automatic ON/OFF switch using Arduino, which can turn on or off gadgets automatically by sensing the presence of human nearby through the concept of ultrasonic.
By: Girish Radhakrishnan
We are going to use ultrasonic module and Arduino to sense the presence of human which activates the gadgets such as table lamp or table fan.
We sometimes forget to turn off the lights or fan while leaving home, at the middle of a trip; we’ll realize that we forgot to turn off “something”. This is enough to ruin our joyful trip. But some don’t even realize it; the energy gets wasted until we return to home.
In this project we are concentrating on gadgets which we use frequently such as table lamps/ table fan and other gadgets, where we sit and move frequently. Leaving these gadgets on for long period may lead to potential energy and money loss.
The Design:
The heart and brain of this smart automatic ON/OFF switch using Arduino is an ultrasonic module, and arduino respectively. The ultrasonic module senses the presence of human, but the ultrasonic module can’t differentiate between a human and an obstacle such as chair in front of the table. Therefore in order to enable this feature we are going to set a threshold distance between the sensor and human.
The distance between the sensor and an object will reduce when new obstacle comes in between them such a human. If Arduino detects the distance between two object the set level goes below the threshold value and this triggers the relay.
When the person moves out of the threshold range it turns off the relay.

The above diagram illustrates the triggering of the relay in the presence of human, since Arduino detected the distance below the threshold value.

The above diagram illustrates that relay is held switched off in the absence of human, since the arduino continues to detect the distance above threshold value.
The program is written in such a way that it measures the distance between the sensor and obstacle in real time.
The users need to input the threshold value in centimeter before uploading to arduino.
The circuit:

The ultrasonic sensor can be directly inserted on analog pins from A0 to A3, sensors facing outward, this may reduce wire congestion while prototyping the circuit.
//--------------------Program developed by R.Girish-------------------//
const int trigger = A1;
const int echo = A2;
int vcc = A0;
int gnd = A3;
int OP = 7;
long Time;
float distanceCM;
float distance = 15; // set threshold distance in cm
float resultCM;
void setup()
{
pinMode(OP,OUTPUT);
pinMode(trigger,OUTPUT);
pinMode(echo,INPUT);
pinMode(vcc,OUTPUT);
pinMode(gnd,OUTPUT);
}
void loop()
{
digitalWrite(vcc,HIGH);
digitalWrite(gnd,LOW);
digitalWrite(trigger,LOW);
delay(1);
digitalWrite(trigger,HIGH);
delayMicroseconds(10);
digitalWrite(trigger,LOW);
Time=pulseIn(echo,HIGH);
distanceCM=Time*0.034;
resultCM=distanceCM/2;
if(resultCM<=distance)
{
digitalWrite(OP,HIGH);
delay(4000);
}
if(resultCM>=distance)
{
digitalWrite(OP,LOW);
}
delay(10);
}
//-----------------Program developed by R.Girish-------------------//
NOTE:
In the program replace the value 15 with your distance between the sensor and table’s edge + 7 to 10cm.
float distance = 15; // set threshold distance in cm
For example: if the distance between sensor and table is 100cm, add 7 to 10 cm more and place the value. The values are in centimeter. It may take up to 4 seconds to turn off the relay after the person moved away from the sensor’s range.
By: Girish Radhakrishnan
We are going to use ultrasonic module and Arduino to sense the presence of human which activates the gadgets such as table lamp or table fan.
We sometimes forget to turn off the lights or fan while leaving home, at the middle of a trip; we’ll realize that we forgot to turn off “something”. This is enough to ruin our joyful trip. But some don’t even realize it; the energy gets wasted until we return to home.
In this project we are concentrating on gadgets which we use frequently such as table lamps/ table fan and other gadgets, where we sit and move frequently. Leaving these gadgets on for long period may lead to potential energy and money loss.
The Design:
The heart and brain of this smart automatic ON/OFF switch using Arduino is an ultrasonic module, and arduino respectively. The ultrasonic module senses the presence of human, but the ultrasonic module can’t differentiate between a human and an obstacle such as chair in front of the table. Therefore in order to enable this feature we are going to set a threshold distance between the sensor and human.
The distance between the sensor and an object will reduce when new obstacle comes in between them such a human. If Arduino detects the distance between two object the set level goes below the threshold value and this triggers the relay.
When the person moves out of the threshold range it turns off the relay.
The above diagram illustrates the triggering of the relay in the presence of human, since Arduino detected the distance below the threshold value.
The above diagram illustrates that relay is held switched off in the absence of human, since the arduino continues to detect the distance above threshold value.
The program is written in such a way that it measures the distance between the sensor and obstacle in real time.
The users need to input the threshold value in centimeter before uploading to arduino.
The circuit:
The ultrasonic sensor can be directly inserted on analog pins from A0 to A3, sensors facing outward, this may reduce wire congestion while prototyping the circuit.
NOTE: #PIN 7 is the output to relay
const int trigger = A1;
const int echo = A2;
int vcc = A0;
int gnd = A3;
int OP = 7;
long Time;
float distanceCM;
float distance = 15; // set threshold distance in cm
float resultCM;
void setup()
{
pinMode(OP,OUTPUT);
pinMode(trigger,OUTPUT);
pinMode(echo,INPUT);
pinMode(vcc,OUTPUT);
pinMode(gnd,OUTPUT);
}
void loop()
{
digitalWrite(vcc,HIGH);
digitalWrite(gnd,LOW);
digitalWrite(trigger,LOW);
delay(1);
digitalWrite(trigger,HIGH);
delayMicroseconds(10);
digitalWrite(trigger,LOW);
Time=pulseIn(echo,HIGH);
distanceCM=Time*0.034;
resultCM=distanceCM/2;
if(resultCM<=distance)
{
digitalWrite(OP,HIGH);
delay(4000);
}
if(resultCM>=distance)
{
digitalWrite(OP,LOW);
}
delay(10);
}
//-----------------Program developed by R.Girish-------------------//
NOTE:
In the program replace the value 15 with your distance between the sensor and table’s edge + 7 to 10cm.
float distance = 15; // set threshold distance in cm
For example: if the distance between sensor and table is 100cm, add 7 to 10 cm more and place the value. The values are in centimeter. It may take up to 4 seconds to turn off the relay after the person moved away from the sensor’s range.
Available link for download
Thursday, September 15, 2016
SERVO CONTROLLED VOLTAGE STABILIZER WITH AUTOMATIC HIGHER AND LOWER CUT OFF
SERVO CONTROLLED VOLTAGE STABILIZER WITH AUTOMATIC HIGHER AND LOWER CUT OFF
ABSTRACT:
This is a stabilizer which constantly monitors the output voltage and controls the variations in the input voltage by movements of a motor. This motor in turn selects the proper output voltage on the variable transformer (variac). This is probably the cheapest power-conditioning product available. It gives reasonably good voltage regulation and is all right where voltage fluctuations are not considerable. However it is not advisable to use it outside big cities where apart from considerable fluctuations in voltage, the power is full of frequency drifts, failures, noise and spikes.
Use of Servo Stabilizer is the only way to control erratic supply voltage conditions. Servo Stabilizer can control all types of loads i.e. inductive, resistive, capacitive loads. Other voltage stabilizers viz. Constant Voltage Transformers or Static Voltage Stabilizers cannot be used in such applications. Servo Stabilizers are available from 1 KVA 1 ph. to 250 KVA 1 ph and 3 KVA 3 ph to 2000 KVA 3 ph. 3 ph. Servo Stabilizers can be for balanced or for unbalanced input voltages. Servo Stabilizer has four major components
- Driver Unit
- Motorized variable voltage auto transformer
- Double-wound Buck Boost / Series transformer
- Servo controlled sensing card (PCB)
After determining Input voltage band and load of customer we design our servo stabilizer to take care of the minimum and maximum voltage fluctuations. While ordering servo stabilizer care should be taken to ensure that servo stabilizer capacity is 20% more than maximum load. In servo stabilizer determine output is determined voltage and the same is set by means of servo controlled sensing card (PCB). Whenever change in output voltage which occurs due to change in Input voltage, the servo controlled sensing card (PCB) gives signal to the motor fitted on variable voltage auto transformer to either increase or decrease the output voltage to achieve the predetermined output voltage.

Available link for download
Sunday, August 28, 2016
Take Control of Your Smartphone’s Automatic Photo Uploads
Take Control of Your Smartphone’s Automatic Photo Uploads

Current cell phones and cloud photograph administrations need to naturally transfer each and every photograph you take to the cloud. Be that as it may, you would prefer dependably not to spare each photograph always on those remote servers.
Programmed photograph transferring guarantees each one of those photographs you take are securely went down some place, however it isnt perfect for each and every photograph. Lamentably, organizations like Apple and Google havent gotten that message.
Pick Whether You Want to Automatically Upload Photos or Not
Contingent upon the applications youve introduced and designed, you might have a few applications transferring your photographs to distinctive areas — for instance, the implicit iCloud Photos highlight on an iPhone and the Dropbox application, or the inherent Google+ application on an Android telephone and the Microsoft OneDrive application.
iPhones and iPads have programmed photograph transfer through iCloud Photo Library. On the off chance that youve empowered iCloud, theres a decent risk you empowered the photograph library highlight which transfers the photographs you take to your iCloud stockpiling. Before long there will be no senseless impediments on the quantity of photographs you can store — you can store every one of the photographs you like, the length of you have some free space in iCloud.
Open the Settings application, tap the iCloud classification, and tap Photos. Utilize the alternatives here to control whether your iPhone or iPad transfers the photographs you take to iCloud.
Android gadgets have programmed photograph transfer through in the "Auto Backup" highlight in the Photos application, which stores your photographs in Google+ Photos (in the past known as Picasa Web Albums.) If youve opened the Google+ application and consented to the brief, theres a decent risk you have this empowered.
Dispatch the Photos application on your Android telephone or tablet, tap the menu catch, tap Settings, and tap Auto Backup. Utilize the choices here to control whether your Android gadget transfers your photographs to your Google+ account.
Whether youre utilizing an iPhone or Android telephone, distributed storage applications like Google+, Dropbox, Microsoft OneDrive, and Flickr can consequently transfer your photographs to the cloud in the event that youve introduced the application and empowered this component. On Windows Phone, the implicit photograph transfer highlight transfers your photographs to OneDrive.
On both gadgets, check any cloud-record capacity or photograph transferring applications youve introduced and ensure photograph transfers are debilitated on the off chance that you would prefer not to utilize them. For instance, on Dropbox for iOS, youll discover this choice under Settings > Camera Upload.
View Photos Youve Uploaded, and Delete Ones You Dont Want to Keep
In the event that you take a delicate photograph — or only a photograph you would prefer not to keep perpetually, in light of the fact that youd rather keep the great ones and not include mess and squander space with the terrible ones — you cant simply erase it on your cell phone to dispose of it. You need to go into the photograph transferring administration itself and erase the photograph from their servers, as well.
For Apples iCloud, you can right now get to these photographs in the Photos application on an iOS gadget, in iPhoto on a Mac, or by means of the Photos sync highlight in the iCloud control board for Windows. Erase any photographs you would prefer not to find in the cloud.
For Google+, you can get to the Google+ Photos site, tap the All Photos choice to see every one of your photographs, select the photographs you would prefer not to keep, and erase them.
For Dropbox and OneDrive, youll simply discover your photographs transferred as documents in your distributed storage account. For instance, in Dropbox youll see them under the Photos view or under the Camera Upload envelope in your rundown of records. You can get to these on your desktop with the Dropbox sync customer, on the Dropbox site, or in a Dropbox versatile application.
For different administrations like Flickr, it works like youd expect — theyll be accessible as photographs in your Flickr account, for instance.
Take Photos and Keep Them Private
Be that as it may, imagine a scenario in which you need to take a photograph without having it transferred to the cloud by any means. Hell, perhaps youre taking photographs of imperative lawful or budgetary archives rather to sweep them. You most likely dont need duplicates of those delicate records put away in Google+, iCloud, or Dropbox until the end of time.
Staying away from the programmed photograph transfer is really somewhat intense. Theres no real way to put the inherent Camera application on iOS or Android into a "kindly dont-transfer these-photographs" mode. Each photograph you take it transferred. In the event that you need to evacuate them, youll need to erase them from the online stockpiling benefit later. In the event that you dont need them to transfer, youll need to pre-emptively cripple the photograph transferring highlights before taking that photograph. In any case, on the off chance that you empower the photograph transferring highlight a short time later, itll likely transfer those photographs in the event that you havent erased them yet.
Filling the crevice are outsider "private camera"- sort applications that permit you to take photographs without putting away them in the framework wide Camera Roll on iOS or Photos on Android. The key here is that the "private camera" application takes photographs and keeps them inside of the application itself, keeping the framework wide photograph stockpiling from getting to and after that naturally transferring them. This isnt a perfect arrangement, yet keeping the photographs separate from the framework wide photographs highlight is the best way to guarantee theyre not transferred.
You could likewise debilitate photograph transfers for all time or simply permit them to transfer and erase them from the distributed storage later. Yet, in the event that theyre delicate, make sure youve cleared your rubbish a while later!
private camera
Obviously, you dont need to utilize programmed photograph transfers. You could simply just physically transfer the photographs you jump at the chance to your distributed storage administration of decision, or even join your telephone to your PC to exchange your photographs off and oversee them the way it was done in the good ol days. Be that as it may, it would be decent in the event that we had more control over which photographs are transferred and which kept focused telephones at the framework
Available link for download
Subscribe to:
Posts (Atom)