Showing posts with label arduino. Show all posts
Showing posts with label arduino. Show all posts
Wednesday, November 2, 2016
Remote Control Circuit Using Arduino
Remote Control Circuit Using Arduino
In this post, we are going to construct a remote control circuit for controlling home appliances using arduino microcontroller.
By: Girish Radhakrishnan
This circuit can turn on/off your gadgets using TV remote’s unused buttons or any other unused remote that may be lying in your junk box for ages.
The motto of this project is to help physically challenged persons, and help them to access the ON/OFF switching of the basic home appliances such as fans or lights independently.
The second objective is to enable the user to control the gadgets “Like a boss” without having to move from his or her existing position.
The circuit utilizes traditional IR based communication between transmitter and receiver.
This circuit is cent percent fool proof to other IR remotes, and other IR sources and less susceptible to errors.
The major problem with non-microcontroller based IR remote control circuit, which is found around the internet, is that it could turn ON/OFF with any IR based remote and can only control one device at an instant and also more susceptible to errors.
This circuit overcomes above specified issues, and we can control several gadgets on one remote and assign keys for specific gadgets.
Before proceeding this project you need to download the library files for arduino form this link and follow the instruction given below: https://github.com/z3t0/Arduino-IRremote
Instructions:
1) Click “clone or download” button form the given link and hit “Download ZIP”.
2) Extract the file and move “IRremote” folder to your library folder of Arduino.
3) Delete “RobotIRremote” folder from your arduino library. “RobotIRremote” has similar definition of “IRremote” library which clash and not able to upload the code to Arduino so, deletion/removal is mandatory.
By duplicating the above instruction your Arduino IDE software is ready for any/most of the IR based projects.
Assign keys for remote:
In our TV remote each key has unique hexadecimal code, which is used to recognize which key is pressed for an operation. Before uploading the final code to Arduino, you need to find what the hexadecimal codes for your keys are.
To do this construct the following circuit in breadboard and follow the instruction.
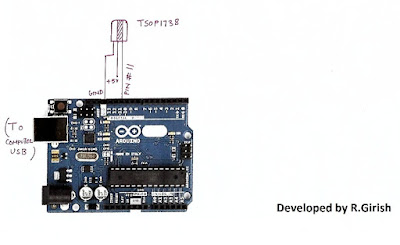
1) Open Arduino IDE and upload example code “IRrecv Demo”
2) Open serial monitor and press the key on remote that you want to use.
You’ll see hexadecimal code pop up as soon as you press the key. That’s the hexadecimal code for that particular key.
3) Do the same for other two keys (3 keys are given in this project for controlling 3 devices)
· We are going to use these hexadecimal codes in the main program and upload to arduino.
//-----------------Program developed by R.Girish-----------//
#include<IRremote.h>
int input = 11;
int op1 = 8;
int op2 = 9;
int op3 = 10;
int intitial1;
int intitial2;
int intitial3;
IRrecv irrecv(input);
decode_results dec;
#define output1 0x111 // place your code received from button A
#define output2 0x112 // place your code received from button B
#define output3 0x113 // place your code received from button C
void setup()
{
irrecv.enableIRIn();
pinMode(op1,1);
pinMode(op2,1);
pinMode(op3,1);
}
void loop() {
if (irrecv.decode(&dec)) {
unsigned int value = dec.value;
switch(value) {
case output1:
if(intitial1 == 1) {
digitalWrite(op1, LOW);
intitial1 = 0;
} else {
digitalWrite(op1, HIGH);
intitial1 = 1;
}
break;
case output2:
if(intitial2 == 1) {
digitalWrite(op2, LOW);
intitial2 = 0;
} else {
digitalWrite(op2, HIGH);
intitial2 = 1;
}
break;
case output3:
if(intitial3 == 1) {
digitalWrite(op3, LOW);
intitial3 = 0;
} else {
digitalWrite(op3, HIGH);
intitial3 = 1;
}
break;
}
irrecv.resume();
}
}
//--------------Program developed by R.Girish-----------//
NOTE:
In the program:
#define output1 0x111 // place your code received from button A
#define output2 0x111 // place your code received from button B
#define output3 0x111 // place your code received from button C
· Place your 3 unique codes from your remote in this place of 111, 112, and 113 and upload the code. Hexadecimal codes will be from 0 to 9 and A to F, for example: 20156, 26FE789, FFFFFF.
· Place your code with “0x” (zero x).
Circuit diagram:
· Pressing key trips the relay ON and by pressing again it will turn off the relay.
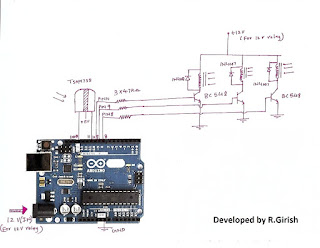
Available link for download

Thursday, October 27, 2016
PROGRAM TO MEASURE DISTANCE BY ULTRASONIC WITH ARDUINO
PROGRAM TO MEASURE DISTANCE BY ULTRASONIC WITH ARDUINO
#define trigPin 12
#define echoPin 2
#include <LiquidCrystal.h>
#define D4 6
#define D5 7
#define D6 8
#define D7 9
#define RS 11
#define EN 12
float tempreture;
LiquidCrystal lcd(12, 11, 6, 7, 8, 9);
void setup()
{
Serial.begin (9600);
pinMode(trigPin, OUTPUT);
pinMode(echoPin, INPUT);
}
void loop() {
float duration, distance;
digitalWrite(trigPin, HIGH);
delayMicroseconds(1000);
digitalWrite(trigPin, LOW);
duration = pulseIn(echoPin, HIGH);
distance = (duration/2) / 29.1;
lcd.clear();
lcd.setCursor(0,0);
lcd.print("Distance; ");
lcd.setCursor(10,0);
lcd.print(distance);
delay(100);
}


#define echoPin 2
#include <LiquidCrystal.h>
#define D4 6
#define D5 7
#define D6 8
#define D7 9
#define RS 11
#define EN 12
float tempreture;
LiquidCrystal lcd(12, 11, 6, 7, 8, 9);
void setup()
{
Serial.begin (9600);
pinMode(trigPin, OUTPUT);
pinMode(echoPin, INPUT);
}
void loop() {
float duration, distance;
digitalWrite(trigPin, HIGH);
delayMicroseconds(1000);
digitalWrite(trigPin, LOW);
duration = pulseIn(echoPin, HIGH);
distance = (duration/2) / 29.1;
lcd.clear();
lcd.setCursor(0,0);
lcd.print("Distance; ");
lcd.setCursor(10,0);
lcd.print(distance);
delay(100);
}
Available link for download
Thursday, October 13, 2016
Voltage Reader with Arduino
Voltage Reader with Arduino
#define buzz 3
int ldrPin=0;
#include <LiquidCrystal.h>
#define D4 6
#define D5 7
#define D6 8
#define D7 9
#define RS 11
#define EN 12
LiquidCrystal lcd(12, 11, 6, 7, 8, 9);
void setup()
{
Serial.begin(9600);
lcd.begin(16, 2);
pinMode(buzz, OUTPUT);
}
void loop()
{
int sensorValue = analogRead(A0);
float voltage = sensorValue * (5.0 / 1023.0);
Serial.print(voltage);
Serial.println(" volts");
if (voltage<=8)
{
digitalWrite(buzz, HIGH);
lcd.clear();
lcd.setCursor(0,0);
lcd.print("MAX VOLTAGE:12");
lcd.setCursor(0,1);
lcd.print("PST VOLTAGE:");
lcd.setCursor(13,1);
lcd.print(voltage);
}
else {
digitalWrite(buzz, LOW);
lcd.clear();
lcd.setCursor(0,0);
lcd.print("MAX VOLTAGE:12");
lcd.setCursor(0,1);
lcd.print("PST VOLTAGE:");
lcd.setCursor(13,1);
lcd.print(voltage);
}}
int ldrPin=0;
#include <LiquidCrystal.h>
#define D4 6
#define D5 7
#define D6 8
#define D7 9
#define RS 11
#define EN 12
LiquidCrystal lcd(12, 11, 6, 7, 8, 9);
void setup()
{
Serial.begin(9600);
lcd.begin(16, 2);
pinMode(buzz, OUTPUT);
}
void loop()
{
int sensorValue = analogRead(A0);
float voltage = sensorValue * (5.0 / 1023.0);
Serial.print(voltage);
Serial.println(" volts");
if (voltage<=8)
{
digitalWrite(buzz, HIGH);
lcd.clear();
lcd.setCursor(0,0);
lcd.print("MAX VOLTAGE:12");
lcd.setCursor(0,1);
lcd.print("PST VOLTAGE:");
lcd.setCursor(13,1);
lcd.print(voltage);
}
else {
digitalWrite(buzz, LOW);
lcd.clear();
lcd.setCursor(0,0);
lcd.print("MAX VOLTAGE:12");
lcd.setCursor(0,1);
lcd.print("PST VOLTAGE:");
lcd.setCursor(13,1);
lcd.print(voltage);
}}
Available link for download
Friday, September 23, 2016
Smart Automatic ON OFF Switch Using Arduino
Smart Automatic ON OFF Switch Using Arduino
In this article we are going to build a smart automatic ON/OFF switch using Arduino, which can turn on or off gadgets automatically by sensing the presence of human nearby through the concept of ultrasonic.
By: Girish Radhakrishnan
We are going to use ultrasonic module and Arduino to sense the presence of human which activates the gadgets such as table lamp or table fan.
We sometimes forget to turn off the lights or fan while leaving home, at the middle of a trip; we’ll realize that we forgot to turn off “something”. This is enough to ruin our joyful trip. But some don’t even realize it; the energy gets wasted until we return to home.
In this project we are concentrating on gadgets which we use frequently such as table lamps/ table fan and other gadgets, where we sit and move frequently. Leaving these gadgets on for long period may lead to potential energy and money loss.
The Design:
The heart and brain of this smart automatic ON/OFF switch using Arduino is an ultrasonic module, and arduino respectively. The ultrasonic module senses the presence of human, but the ultrasonic module can’t differentiate between a human and an obstacle such as chair in front of the table. Therefore in order to enable this feature we are going to set a threshold distance between the sensor and human.
The distance between the sensor and an object will reduce when new obstacle comes in between them such a human. If Arduino detects the distance between two object the set level goes below the threshold value and this triggers the relay.
When the person moves out of the threshold range it turns off the relay.

The above diagram illustrates the triggering of the relay in the presence of human, since Arduino detected the distance below the threshold value.

The above diagram illustrates that relay is held switched off in the absence of human, since the arduino continues to detect the distance above threshold value.
The program is written in such a way that it measures the distance between the sensor and obstacle in real time.
The users need to input the threshold value in centimeter before uploading to arduino.
The circuit:

The ultrasonic sensor can be directly inserted on analog pins from A0 to A3, sensors facing outward, this may reduce wire congestion while prototyping the circuit.
//--------------------Program developed by R.Girish-------------------//
const int trigger = A1;
const int echo = A2;
int vcc = A0;
int gnd = A3;
int OP = 7;
long Time;
float distanceCM;
float distance = 15; // set threshold distance in cm
float resultCM;
void setup()
{
pinMode(OP,OUTPUT);
pinMode(trigger,OUTPUT);
pinMode(echo,INPUT);
pinMode(vcc,OUTPUT);
pinMode(gnd,OUTPUT);
}
void loop()
{
digitalWrite(vcc,HIGH);
digitalWrite(gnd,LOW);
digitalWrite(trigger,LOW);
delay(1);
digitalWrite(trigger,HIGH);
delayMicroseconds(10);
digitalWrite(trigger,LOW);
Time=pulseIn(echo,HIGH);
distanceCM=Time*0.034;
resultCM=distanceCM/2;
if(resultCM<=distance)
{
digitalWrite(OP,HIGH);
delay(4000);
}
if(resultCM>=distance)
{
digitalWrite(OP,LOW);
}
delay(10);
}
//-----------------Program developed by R.Girish-------------------//
NOTE:
In the program replace the value 15 with your distance between the sensor and table’s edge + 7 to 10cm.
float distance = 15; // set threshold distance in cm
For example: if the distance between sensor and table is 100cm, add 7 to 10 cm more and place the value. The values are in centimeter. It may take up to 4 seconds to turn off the relay after the person moved away from the sensor’s range.
By: Girish Radhakrishnan
We are going to use ultrasonic module and Arduino to sense the presence of human which activates the gadgets such as table lamp or table fan.
We sometimes forget to turn off the lights or fan while leaving home, at the middle of a trip; we’ll realize that we forgot to turn off “something”. This is enough to ruin our joyful trip. But some don’t even realize it; the energy gets wasted until we return to home.
In this project we are concentrating on gadgets which we use frequently such as table lamps/ table fan and other gadgets, where we sit and move frequently. Leaving these gadgets on for long period may lead to potential energy and money loss.
The Design:
The heart and brain of this smart automatic ON/OFF switch using Arduino is an ultrasonic module, and arduino respectively. The ultrasonic module senses the presence of human, but the ultrasonic module can’t differentiate between a human and an obstacle such as chair in front of the table. Therefore in order to enable this feature we are going to set a threshold distance between the sensor and human.
The distance between the sensor and an object will reduce when new obstacle comes in between them such a human. If Arduino detects the distance between two object the set level goes below the threshold value and this triggers the relay.
When the person moves out of the threshold range it turns off the relay.
The above diagram illustrates the triggering of the relay in the presence of human, since Arduino detected the distance below the threshold value.
The above diagram illustrates that relay is held switched off in the absence of human, since the arduino continues to detect the distance above threshold value.
The program is written in such a way that it measures the distance between the sensor and obstacle in real time.
The users need to input the threshold value in centimeter before uploading to arduino.
The circuit:
The ultrasonic sensor can be directly inserted on analog pins from A0 to A3, sensors facing outward, this may reduce wire congestion while prototyping the circuit.
NOTE: #PIN 7 is the output to relay
const int trigger = A1;
const int echo = A2;
int vcc = A0;
int gnd = A3;
int OP = 7;
long Time;
float distanceCM;
float distance = 15; // set threshold distance in cm
float resultCM;
void setup()
{
pinMode(OP,OUTPUT);
pinMode(trigger,OUTPUT);
pinMode(echo,INPUT);
pinMode(vcc,OUTPUT);
pinMode(gnd,OUTPUT);
}
void loop()
{
digitalWrite(vcc,HIGH);
digitalWrite(gnd,LOW);
digitalWrite(trigger,LOW);
delay(1);
digitalWrite(trigger,HIGH);
delayMicroseconds(10);
digitalWrite(trigger,LOW);
Time=pulseIn(echo,HIGH);
distanceCM=Time*0.034;
resultCM=distanceCM/2;
if(resultCM<=distance)
{
digitalWrite(OP,HIGH);
delay(4000);
}
if(resultCM>=distance)
{
digitalWrite(OP,LOW);
}
delay(10);
}
//-----------------Program developed by R.Girish-------------------//
NOTE:
In the program replace the value 15 with your distance between the sensor and table’s edge + 7 to 10cm.
float distance = 15; // set threshold distance in cm
For example: if the distance between sensor and table is 100cm, add 7 to 10 cm more and place the value. The values are in centimeter. It may take up to 4 seconds to turn off the relay after the person moved away from the sensor’s range.
Available link for download
Wednesday, September 14, 2016
Tempreture based cooler with Arduino
Tempreture based cooler with Arduino
#define output1 2
#define output2 3
#define output3 4
#define output4 5
#define led 13
#define pump 1
//LCD PINS
#define D4 6
#define D5 7
#define D6 8
#define D7 9
#define RS 11
#define EN 12
#include <string.h>
#include <LiquidCrystal.h>
int lm35Pin = 0;
int time;
float tempreture;
LiquidCrystal lcd(12, 11, 6, 7, 8, 9);
void setup()
{
Serial.begin (9600);
lcd.begin(16, 2);
pinMode(output1, OUTPUT);
pinMode(output2, OUTPUT);
pinMode(output3, OUTPUT);
pinMode(output4, OUTPUT);
pinMode(led, OUTPUT);
pinMode(pump, OUTPUT);
}
void loop() {
tempreture = analogRead(lm35Pin);
tempreture = tempreture * 0.48828125;
lcd.setCursor(0,0);
lcd.print("TEMPRETURE:");
lcd.setCursor(12,0);
lcd.print(tempreture);
digitalWrite(output1, HIGH);
digitalWrite(output2, LOW);
digitalWrite(output3, LOW);
digitalWrite(output4, LOW);
if(tempreture>= 35)
{
digitalWrite(output2, HIGH);
digitalWrite(output1, LOW);
digitalWrite(output3, LOW);
digitalWrite(output4, LOW);
}
else if(tempreture>= 45)
{
digitalWrite(output3, HIGH);
digitalWrite(output2, LOW);
digitalWrite(output1, LOW);
digitalWrite(output4, LOW);
}
else if(tempreture>= 50)
{
digitalWrite(output4, HIGH);
digitalWrite(output2, LOW);
digitalWrite(output3, LOW);
digitalWrite(output1, LOW);
}
digitalWrite(pump, HIGH);
delay(40000);
digitalWrite(pump, LOW);
}
#define output2 3
#define output3 4
#define output4 5
#define led 13
#define pump 1
//LCD PINS
#define D4 6
#define D5 7
#define D6 8
#define D7 9
#define RS 11
#define EN 12
#include <string.h>
#include <LiquidCrystal.h>
int lm35Pin = 0;
int time;
float tempreture;
LiquidCrystal lcd(12, 11, 6, 7, 8, 9);
void setup()
{
Serial.begin (9600);
lcd.begin(16, 2);
pinMode(output1, OUTPUT);
pinMode(output2, OUTPUT);
pinMode(output3, OUTPUT);
pinMode(output4, OUTPUT);
pinMode(led, OUTPUT);
pinMode(pump, OUTPUT);
}
void loop() {
tempreture = analogRead(lm35Pin);
tempreture = tempreture * 0.48828125;
lcd.setCursor(0,0);
lcd.print("TEMPRETURE:");
lcd.setCursor(12,0);
lcd.print(tempreture);
digitalWrite(output1, HIGH);
digitalWrite(output2, LOW);
digitalWrite(output3, LOW);
digitalWrite(output4, LOW);
if(tempreture>= 35)
{
digitalWrite(output2, HIGH);
digitalWrite(output1, LOW);
digitalWrite(output3, LOW);
digitalWrite(output4, LOW);
}
else if(tempreture>= 45)
{
digitalWrite(output3, HIGH);
digitalWrite(output2, LOW);
digitalWrite(output1, LOW);
digitalWrite(output4, LOW);
}
else if(tempreture>= 50)
{
digitalWrite(output4, HIGH);
digitalWrite(output2, LOW);
digitalWrite(output3, LOW);
digitalWrite(output1, LOW);
}
digitalWrite(pump, HIGH);
delay(40000);
digitalWrite(pump, LOW);
}
Available link for download
Tuesday, September 13, 2016
Ultrasonic Distance Meter Circuit Using Arduino and 16x2 LCD
Ultrasonic Distance Meter Circuit Using Arduino and 16x2 LCD
In this article we are going to construct an ultrasonic distance meter circuit using Arduino and 16x2 LCD. We are also going to see what an ultrasonic module is, how it works and how it can be used to measure distance.
By: Girish Radhakrishnan
What is ultrasonic?
An average healthy human being can hear frequencies ranging from 20 Hz to 20,000 Hz. Above 20,000Hz or 20 KHz human ear is incapable of detecting these frequencies. Any acoustic resonates greater than 20 KHz is called as ultrasonic and any acoustics resonates less than 20 Hz is called infrasonic.
Most of the domestic animals such cat or dog, can hear wide range of acoustic frequency greater than human beings. Some of our electronic devices may annoy them; thats why ultrasonic sound is being used in electronic mosquito repellents and also in dog repellents.
But many of the wild animals such as bats take advantage of ultrasonic, which helps them to determine the distance between the predator and prey. It has biological sensors which calculate the distance by emitting and receiving ultrasonic waves.
This principle is utilized in many modern electronic measuring equipment; we will learn how the same principle could be applied for the present project also.
Ultrasonic sensor:
We are going to use a special electronic device ultrasonic transceiver module HC-SR04 which is very popular and commonly available on e-commerce sites and electronic retail stores.
It consists of 4 pins Vcc, ground, trigger and echo. These pins are interfaced with arduino microcontroller.
It has a transmitter and receiver modules which look identical and are protected by aluminum cylinder and mesh at the opening of transmitter and receiver. The module also consists of microcontrollers which decodes echo signals.
To measure distance, we need to send series of ultrasonic bursts and listen for the echo. To do this we need to keep the trigger pin high for 10 microseconds, the transmitter sends out 8 pulses of ultrasonic bursts.
The receiver module listens to those bursts after hitting an obstacle. The echo pin gives out high signal proportional to the distance. The Arduino interpret the time of sent and received signals to determine the actual distance.
Since the sound travels at 340 m/s in air and the time can be determined by comparing sent and received signals, we can determine distance by using speed-distance formula:
Distance = speed x time
These values will be calculated by Arduino and print appropriate values on the LCD display. The proposed ultrasonic distance meter circuit can show distance in centimeter as well as in meter.
Author’s prototype:

Circuit diagram:

The ultrasonic distance meter circuit connection is done through a standard arduino-LCD interface, which we can also find on many other similar arduino-LCD based projects. The potentiometer is used to adjust the contrast of LCD display.
The ultrasonic sensor can be directly inserted on analog pin as shown in author’s prototype from A0 to A3, sensors facing outwards; this may reduce wire congestion while duplicating the above circuit.
By: Girish Radhakrishnan
What is ultrasonic?
An average healthy human being can hear frequencies ranging from 20 Hz to 20,000 Hz. Above 20,000Hz or 20 KHz human ear is incapable of detecting these frequencies. Any acoustic resonates greater than 20 KHz is called as ultrasonic and any acoustics resonates less than 20 Hz is called infrasonic.
Most of the domestic animals such cat or dog, can hear wide range of acoustic frequency greater than human beings. Some of our electronic devices may annoy them; thats why ultrasonic sound is being used in electronic mosquito repellents and also in dog repellents.
But many of the wild animals such as bats take advantage of ultrasonic, which helps them to determine the distance between the predator and prey. It has biological sensors which calculate the distance by emitting and receiving ultrasonic waves.
This principle is utilized in many modern electronic measuring equipment; we will learn how the same principle could be applied for the present project also.
Ultrasonic sensor:
We are going to use a special electronic device ultrasonic transceiver module HC-SR04 which is very popular and commonly available on e-commerce sites and electronic retail stores.
It consists of 4 pins Vcc, ground, trigger and echo. These pins are interfaced with arduino microcontroller.
It has a transmitter and receiver modules which look identical and are protected by aluminum cylinder and mesh at the opening of transmitter and receiver. The module also consists of microcontrollers which decodes echo signals.
To measure distance, we need to send series of ultrasonic bursts and listen for the echo. To do this we need to keep the trigger pin high for 10 microseconds, the transmitter sends out 8 pulses of ultrasonic bursts.
The receiver module listens to those bursts after hitting an obstacle. The echo pin gives out high signal proportional to the distance. The Arduino interpret the time of sent and received signals to determine the actual distance.
Since the sound travels at 340 m/s in air and the time can be determined by comparing sent and received signals, we can determine distance by using speed-distance formula:
Distance = speed x time
These values will be calculated by Arduino and print appropriate values on the LCD display. The proposed ultrasonic distance meter circuit can show distance in centimeter as well as in meter.
Author’s prototype:
Circuit diagram:
The ultrasonic distance meter circuit connection is done through a standard arduino-LCD interface, which we can also find on many other similar arduino-LCD based projects. The potentiometer is used to adjust the contrast of LCD display.
The ultrasonic sensor can be directly inserted on analog pin as shown in author’s prototype from A0 to A3, sensors facing outwards; this may reduce wire congestion while duplicating the above circuit.
Program:
//--------------------Program developed by R.Girish-------------------//
#include <LiquidCrystal.h>
LiquidCrystal lcd(12,11,5,4,3,2);
const int trigger = A1;
const int echo = A2;
int vcc = A0;
int gnd = A3;
long Time;
float distanceCM;
float distanceM;
float resultCM;
float resultM;
void setup()
{
lcd.begin(16,2);
pinMode(trigger,OUTPUT);
pinMode(echo,INPUT);
pinMode(vcc,OUTPUT);
pinMode(gnd,OUTPUT);
}
void loop()
{
digitalWrite(vcc,HIGH);
digitalWrite(gnd,LOW);
digitalWrite(trigger,LOW);
delay(1);
digitalWrite(trigger,HIGH);
delayMicroseconds(10);
digitalWrite(trigger,LOW);
Time=pulseIn(echo,HIGH);
distanceCM=Time*0.034;
resultCM=distanceCM/2;
resultM=resultCM/100;
lcd.setCursor(0,0);
lcd.print("Distance:");
lcd.print(resultM);
lcd.print("M");
lcd.setCursor(0,1);
lcd.print("Distance:");
lcd.print(resultCM);
lcd.print("cm");
delay(1000);
}
//-----------------Program developed by R.Girish-------------------//
Available link for download
Subscribe to:
Posts (Atom)