Showing posts with label your. Show all posts
Showing posts with label your. Show all posts
Sunday, November 6, 2016
Wapdam Com Download Free Music Videos to Your Phone
Wapdam Com Download Free Music Videos to Your Phone
www.Wapdam.Com is one website to Download Free Music Videos to Your Phone.
There are many websites to download free Music Videos of your choice if you are a Music lover, but visiting the right website to download Music Videos will not only save you stress and time but will also save you handsome amount of data, since data subscription plans are very expensive in Nigeria and even in some other countries and territories which in turn, means you have to spend your data wisely.
See:

Wapdam.Com
Just because of the fact that Im a Music lover, many of my friends and colleagues are always surprised whenever they see the latest Music Videos on my Smartphone and thats why Im writing this post, to enable others who also like to download Music Videos on their Phones easily without facing any trouble. The website I always use to download Music Videos is Wapdam, few reasons why I use Wapdam is because of its easy accessibility & navigation, low file size with high video quality and so on. Without any further ado, the following procedure will teach you how to get any of the latest and newest Music Videos you like on your Phone within few seconds or minutes, depending on your internet connection speed.
Note - This Procedure must be followed on your Phone, not on your PC Browser because navigating to Wapdam on a PC will automatically redirect you to the PC version, which will not allow you to download anything at all.
==> Visit Wapdam and Click on Videos
Wapdam
==> Now, a long list of Video types will be listed just as shown below. Just click on Music Clips
==> A page similar to the one in the screenshot below will be displayed, where you can choose from New Music Videos, Most Downloaded, RnB, Hip Hop, Rap, Nigeria Special, Pop etc.
==> The option you click among those mentioned above will determine what will be displayed here. I love Pop music and I clicked on it, thats why we have the screenshot below. For example, lets assume we want to download Shakira ft Rihanna - Cant Remember to Forget You Music Video.
==> The Shakira ft Rihanna - Cant Remember to Forget You Music Video which I clicked listed a page with the download types available, ranging from super quality which has a file size of 10818KB (10MB) to low quality which has a file size of 3023KB (3MB). Just click on anyone that suits you most and the video will be downloaded to your phone in few minutes (depending on your Data speed)
Note - You can use the Search box on the website to search for a Music Video directly instead of looking for it all around, it will save you time & stress.
Also See:
There are many websites to download free Music Videos of your choice if you are a Music lover, but visiting the right website to download Music Videos will not only save you stress and time but will also save you handsome amount of data, since data subscription plans are very expensive in Nigeria and even in some other countries and territories which in turn, means you have to spend your data wisely.
See:
- Waphan Whatsapp Download
- Download latest imo on Android
Wapdam.Com
Just because of the fact that Im a Music lover, many of my friends and colleagues are always surprised whenever they see the latest Music Videos on my Smartphone and thats why Im writing this post, to enable others who also like to download Music Videos on their Phones easily without facing any trouble. The website I always use to download Music Videos is Wapdam, few reasons why I use Wapdam is because of its easy accessibility & navigation, low file size with high video quality and so on. Without any further ado, the following procedure will teach you how to get any of the latest and newest Music Videos you like on your Phone within few seconds or minutes, depending on your internet connection speed.
Note - This Procedure must be followed on your Phone, not on your PC Browser because navigating to Wapdam on a PC will automatically redirect you to the PC version, which will not allow you to download anything at all.
==> Visit Wapdam and Click on Videos
Wapdam
==> Now, a long list of Video types will be listed just as shown below. Just click on Music Clips
==> A page similar to the one in the screenshot below will be displayed, where you can choose from New Music Videos, Most Downloaded, RnB, Hip Hop, Rap, Nigeria Special, Pop etc.
==> The option you click among those mentioned above will determine what will be displayed here. I love Pop music and I clicked on it, thats why we have the screenshot below. For example, lets assume we want to download Shakira ft Rihanna - Cant Remember to Forget You Music Video.
==> The Shakira ft Rihanna - Cant Remember to Forget You Music Video which I clicked listed a page with the download types available, ranging from super quality which has a file size of 10818KB (10MB) to low quality which has a file size of 3023KB (3MB). Just click on anyone that suits you most and the video will be downloaded to your phone in few minutes (depending on your Data speed)
Note - You can use the Search box on the website to search for a Music Video directly instead of looking for it all around, it will save you time & stress.
Also See:
- www.waptrick.com music, videos, songs
- 2go Download - Download latest 2go App
Available link for download

Tuesday, October 18, 2016
Pothography Can sell your photos online
Pothography Can sell your photos online
Hello friends,
If photography is your passion then show your talents to the world.
Shutterstock.com is portal where you can sell your photos. Only you need to register with shutterstock.com and upload your photos. Many photographers are selling photos and video all over the world through this portal.
Its time to make your passion your career.
Visit : www.shutterstock.com

Available link for download
Tuesday, October 11, 2016
Using Wireless Network on Your Android Phone
Using Wireless Network on Your Android Phone

We should be living in a remote future, yet were not exactly there yet. Still, numerous things we do with links dont really require links any longer — you can run sans wire with only a couple changes.
There are still reasons you may feel you need to join your telephone to your PC or plug in a link, yet those can be kept away from with these traps.
Remote File Transfers
AirDroid can be utilized for some things, including messaging by means of your Android telephone on your PC like Apples iMessage. In any case, AirDroid likewise incorporates a document supervisor. That document chief permits you to remotely exchange records forward and backward — for instance, moving music documents to your telephone or exchanging photographs to your PC — by means of a web program or desktop application. Everything works totally remotely, and it can work completely over a nearby Wi-Fi association. It essentially transforms your Android telephone into a little web server when you have the application running.
Use Dropbox, Google Drive, OneDrive, and Other Cloud Storage Services
As opposed to utilizing an application like AirDroid, you can simply depend on your preferred distributed storage administration rather — that implies something like Dropbox, Google Drive, or Microsofts OneDrive.
Transfer a record to your distributed storage from your telephone — potentially utilizing the advantageous Android Share catches youll discover in about each application or a full-included document supervisor — and it can consequently match up to your PC. Add a record to your distributed storage on your PC and itll show up in the proper application on your telephone so you can get to it from that point.
Exchange Photos (and Screenshots) With Dropbox, Google Plus, OneDrive, and the sky is the limit from there
Photograph exchanges are significantly less demanding than document exchanges. Numerous applications can naturally transfer photographs you take to a distributed storage administration, where theyll be synchronized to your PC remotely. For instance, Dropbox and Microsoft OneDrive both have an "auto-transfer" include that will consequently transfer photographs you take, and theyll be synchronized straight to your PC so you can get to them where you require them. Google Plus additionally has a comparative programmed photograph transfer highlight, however the photographs you transfer will be sent to Google+ Photos and not downloaded naturally to your PC.
These applications treat screenshots the same, too. You can take a screenshot of your Android telephone and it will be naturally transferred to your distributed storage account and downloaded straight to your PC with no extra taps on your screen, a great deal less a link.
Use ADB Commands Over a Wireless Connection
RELATED ARTICLE
The most effective method to Install and Use ADB, the Android Debug Bridge Utility
ADB, Android Debug Bridge, is an order line utility included with Googles Android SDK. ADB can control your gadget over USB... [Read Article]
Indeed, even the ADB order — expected for engineers, additionally utilized by aficionados who need to open root and do different other intense things to their telephones — can be utilized remotely on the off chance that you dont need keep your telephone joined with a PC.
Sadly, this requires a link to set up the association. Be that as it may, after you have, you can disengage the link and keep utilizing adb summons remotely until you end the adb association. That implies you can control and control your telephone from your PC without the link.
Googles official adb documentation offers directions for utilizing adb remotely.
Charge Your Phone Wirelessly (or Use a Dock)
A significant number of Android telephones have fabricated in remote charging equipment, so you may not even need to connect to your telephone when its a great opportunity to squeeze up its battery. Simply get a good remote charger and place your telephone on the remote charger to charge it.
Telephones like Googles own particular Nexus telephones coordinate this, and there are approaches to add on remote charging regardless of the possibility that your telephone doesnt have it. Theres dependably the choice of a remote charging case — a case you put your telephone into increase remote charging — and Samsungs telephones with removable plastic backs and batteries can likewise regularly have their backs swapped out for equipment that is perfect with remote charging.
Remote charging is cool and advanced, yet it is less effective, slower, and shockingly finicky. You truly need to set the telephone on the charger in a sure place. You could simply skirt all that and get a dock you can embed your telephone into when its an ideal opportunity to charge.
Get Bluetooth Headphones
You may at present end up uniting a couple of earphones to your telephone when you have to listen to something, however you dont need to! You could utilize a couple of Bluetooth earphones or earbuds to listen to everything remotely and dodge all the tangled earphone links.
You will need to charge the Bluetooth earphones, which is the exchange off. In any case, Bluetooth earphones are showing signs of improvement and better. Because of advancements like Bluetooth low vitality, were currently beginning to see remote earbuds. A few organizations were demonstrating to them off at CES 2015, and theyll ideally come to showcase this year.
bluetooth earphones
On the off chance that you need to live in the without wire future, you can begin today. Whenever youre going to haul out a USB link — or even a charging link or earphone link — consider it for a minute.
Available link for download
Monday, October 10, 2016
Warning Your Android Phone’s Web Browser Probably Isn’t Getting Security Updates
Warning Your Android Phone’s Web Browser Probably Isn’t Getting Security Updates

The web browser in Android 4.3 and earlier has many big security problems, and Google won’t be patching it anymore. If you use a device with Android 4.3 Jelly Bean or earlier, you need to take action.
This problem is fixed in Android 4.4 and 5.0, but more than 60 percent of Android devices are stuck on devices that won’t receive any security fixes.
Why Google Isn’t Patching Android 4.3’s Browser Anymore
Android operating system updates are a mess. Manufacturers put out a huge number of different phones and modify the code extensively. Google can’t just update the operating system on your device — they can only put out new code and hope the device’s manufacturer and your cellular carrier do the hard work of getting it to you.
Traditionally, most Android components have been baked in at the operating system level. This includes the built-in web browser, named “Browser.” Importantly, the Browser itself and the underlying rendering engine are built into the operating system. The browser engine is used in every Android app that uses an embedded web browser, known as a “WebView.”
This built-in browser is based on an old version of WebKit, and a serious flaw was recently discovered in it and reported to Google. Google has no way of providing an update directly to Android users to fix this problem. It has to be fixed through an operating system update, which requires device manufacturers and carriers do the work.
Sadly, even when Google was releasing security update code for Android 4.3’s browser, many device manufacturers may not have even been shipping the fixes to their users. The only saving grace is that many Android devices have shipped with Google Chrome, and users are safe while using Chrome on those devices — but, again, not while using other apps with embedded web browsers.
Most Android Users Are Stranded, But Android 4.4 and Newer Are Fixed
Google has been working on making Android OS updates matter less, breaking more features out of the core operating system so they can be updated via Google Play. In Android 4.4, the built-in browser can be quickly updated by device manufacturers with a tiny patch. In Android 5.0, the browser is updated by Google directly through Google Play.
But more than 60 percent of devices are using Android 4.3 and lower, according to Google’s own numbers. Google hasn’t released a “patch” for Android 4.3, but — if they did — it’d be up to phone manufacturers and cellular carriers to roll it out. Really, Google sees updating devices to Android 4.4 as the fix, and device manufacturers should be working on that instead.
We don’t mean to absolve Google here. Building the browser deep into the operating system so it can’t be quickly updated to fix security holes was a terrible decision, and we can only be thankful they’ve now changed the way modern versions of Android work. Device manufacturers and cellular carriers deserve a lot of the blame for not updating devices promptly. If you have a phone bought on a two-year contract, they should at least update the device with security updates for the length of the contract!
How to Stay Safe on Android 4.3 and Previous Versions
But this isn’t just an interesting debate between Google and security professionals online. The reality is that most Android users are using a vulnerable web browser, and you may be one of them. Here’s what you can do to stay as safe as possible:
Install and Use a Different Web Browser: Don’t use the built-in “Browser” app to browse the web. Instead, install a browser like Mozilla Firefox or Google Chrome from Google Play. Chrome only works on Android 4.0 and up, but Mozilla Firefox still works on Android 2.3 Gingerbread. These browsers include their own rendering engines, so they don’t use the system’s browser engine. They’re also frequently updated via Google Play. You’ll probably find these browsers faster than the built-in browser if you have an older device with older built-in browser code, anyway!
Avoid Browsing With Embedded Web Browsers: Just using a third-party browser won’t fix everything, as you’ll still be at risk if you use an embedded web browser in an app — these use the system’s “WebView,” which is vulnerable. Avoid browsing with embedded browsers if you have a vulnerable version of Android. Stick to a dedicated browser app like Firefox or Chrome.
Google actually recommended Android apps developers bundle browser engines in their apps on Android 4.3 and earlier. That’s the only way they can ensure their built-in browsers are safe and secure. This is a dirty hack around the rotting browser code in Android itself. It’s a pretty crazy recommendation, but developers may actually want to consider this — especially if security is particularly important to the app.
So how much of a risk is this, really? Well, we haven’t heard of anyone exploiting it yet. But Google’s clear signal that 60 percent of all current Android devices won’t be receiving browser security patches has surely been welcome to attackers. We expect to see Android browser exploits make their way into various mass-market collections of exploits, as Google abandoning the browser used on most Android devices leaves a gaping hole that can be freely exploited without the risk that patches will fix the problems.
It’s a bit like the security problems with still using Windows XP — if Windows XP was still being used by the majority of users when it was abandoned. Yes, the Android ecosystem is a mess. It should be possible for Google to get browser security updates to their users, but it’s not.
Available link for download
Saturday, September 17, 2016
What You Can Do With Your iPhone’s Health App
What You Can Do With Your iPhone’s Health App

Apples Health application touched base in iOS 8, and its presently on each exceptional iPhone. This application seems basic at first look, however it shrouds a considerable measure of information and propelled usefulness.
The Health application is in really the client unmistakable face of HealthKit, Apples endeavor at putting all your wellbeing information in one spot.
The Dashboard (and Step Tracking)
Open up the Health application and youll see the Dashboard. On the off chance that you have an iPhone 6 or iPhone 6 Plus, the telephones inherent, low-power step following sensor will consequently populate this information with data about your physical movement. The sensor tracks the strides you take, the separation you walk or run, and the flights of stairs you climb. You can then perceive how dynamic you were in the course of the most recent day, week, month, or year.
On the off chance that you have an iPhone 6 or 6 Plus, you can utilize the Health application as a speedy approach to perceive the amount youre strolling and running — no different pedometer or step-GPS beacon fundamental. With no extra applications or devices, this is all a great many people will see on their iPhones Health application — accepting they have a cutting edge iPhone with these sensors.
In spite of the fact that the Dashboard naturally incorporates this stride information on the off chance that you have an iPhone 6, you can really show any sort of information on the Dashboard you like. Well cover that later.
Medicinal ID
The Medical ID tab permits you to make a "Medicinal ID." This is data that can be shown on your lock screen without opening your telephone. The thought is that you can include data about you that may be helpful in a crisis — medicinal conditions, hypersensitivities, blood classification, organ giver status, crisis contacts, and the sky is the limit from there. These critical subtle elements can then be gotten to from your telephones lock screen if individuals need to know it in a crisis.
This is kind of an advanced adaptation of the medicinal ID wristband, yet it depends on somebody checking your iPhone in a crisis. Its additionally a touch intense to discover, as somebody needs to tap the Emergency catch on the lock screen to open the crisis dialer and after that tap Medical ID. On the off chance that more individuals use Medical ID, maybe Medical ID will be regularly checked later on. As of right now, I would stay with a committed therapeutic ID wristband in case youre truly agonized over conveying vital points of interest in a crisis.
Wellbeing Data
The Health Data tab is a gigantic rundown of distinctive sorts of wellbeing information. This is really a rundown of all the diverse sorts of information Apples "HealthKit" administration can track. Apples HealthKit administration will permit outsider wellbeing following contraptions and applications to impart their information to Apples Health application and access the information you have put away there, in the event that you give them consent. The Health application should be a solitary vault where all your Health information is put away.
On the off chance that you have applications or gadgets that coordinate with HealthKit, they can naturally add information to the distinctive sorts of Health Data, pretty much as your iPhone is continually upgrading the stride following information with information from its own sensors. Apples own particular Apple Watch will incorporate wellness following elements that coordinate with HealthKit, for instance.
In any case, you can really include a ton of information by hand, on the off chance that you need. For instance, suppose you measure yourself day by day. You can go into Health Data > Body Measurements > Weight and tap Add Data Point. Consistently when you measure yourself, you can include the most recent estimation here and track a background marked by your weight. You can even flip the "Show on Dashboard" alternative to On so you can see your weight on the Dashboard screen.
This isnt the most advantageous alternative, obviously. Over the long haul, Apple might want for you to get some kind of Bluetooth-empowered scale that will naturally enter your weight into HealthKit when you measure yourself. Be that as it may, on the off chance that youd like to track something physically — whether its weight, pulse, time spent dozing, or caffeine consumption — you can include it physically. You are constrained to sorts of information Apple incorporates, be that as it may. There are some observable exclusions at this time.
For every kind of information, you can likewise tap "Offer Data" to see which applications are consequently giving this information to the Health application, and which applications have been offered authorization to see the information.
Sources
RELATED ARTICLE
iOS Has App Permissions, Too: And Theyre Arguably Better Than Androids
Android has an authorizations framework for individual applications, however so do iPhones and iPads. Android gives you a solitary brief... [Read Article]
The Sources tab looks a touch desolate as a matter of course. Applications you introduce from the App Store might ask for access to redesign your wellbeing information, and theyll show up here in the wake of asking for authorization to do as such. This tab may be valuable on the off chance that youve effectively offered access to such applications, so you can see which applications have admittance.
For instance, suppose you have an action following band that tracks the time you spend snoozing or a restroom scale that can report your weight to your telephone through Bluetooth. The going with applications on your telephone can ask for authorization to incorporate with HealthKit. They can then put their information into the Health application so you can get to everything in one spot. This information can then be imparted to different applications, which could utilize it to give bits of knowledge after they take a gander at months or years of diverse information focuses.
It isnt about physical sensors, obviously. An application that you physically enter information into could likewise coordinate with HealthKit, naturally replicating the information you went into HealthKit so its all accessible in one focal area.
This application is really not extremely Apple-like from numerous points of view. The Dashboard is decent, and Medical ID is alright, yet you can without much of a stretch wind up in the weeds in the event that you tap Health Data and begin glancing around.
While its conceivable to fanatically enter all the information focuses you have physically, the genuine expectation is for you to utilize gadgets and applications that naturally enter the information for you. To discover these applications, youll need to look somewhere else — the Health application on iOS doesnt yet offer you some assistance with finding HealthKit-empowered applications and gadgets. That appears like a conspicuous accommodating component Apple ought to include what
Available link for download
Thursday, September 15, 2016
On Page SEO Techniques To Boost Your Rankings – 2015
On Page SEO Techniques To Boost Your Rankings – 2015
When it comes about Search engine optimization a lot has changed in recent years. There are two factors that play the main role in SEO are On page optimization and Off page optimization. In this article we discuss about some Best On Page SEO Techniques which you should implement on your blog to grow your website’s organic traffic. On-page SEO is most important for you to target keyword.
 On page SEO includes the use of proper heading, adding keywords, relevant content. It is important to get higher visibility of your blog in search engine ranking. We will look into them one by one in this detailed post.
The blog post title is the most important On-page SEO factor which really plays a big role in search engines. Use targeted keywords in the beginning of the title tag. Keep Title no more than 70 characters, including spaces. Do not use stop words. Avoid duplicates and keyword stuffing.
Post Permalink Structure
A permalink is a specific web page of a search in the database. Search engine optimized URL include targeted keywords in the beginning of the blog post. Avoid using special characters, brackets, symbols etc. You can use alphabets and numbers in your URL structure.
Heading Tags
Use heading tags like h2, h3 and h4 etc to highlight different targeted keywords. The title tag is used as h1 tag. Don’t repeat h1, h2 or h3 tags too many times, It is considered as negative SEO.
Keyword Density
You should keep the keyword density to up to 3 percent only. You should be using your targeted keyword in the first paragraph and in the last paragraph. You should use bold, underline and italic to highlight important keywords in your blog post.
Meta Tags
You should add unique meta keyword and meta description related to each of your blog post. You must use the targeted keyword in the meta description. Length of the meta description is less than 160 characters including spaces. Write user SEO friendly meta description tags for search engines.
Addition of Images
Image optimization for SEO is the basic step for SEO. Images helps to derive a lot of traffic from image search. To get to the top search ranking you should use Descriptive Image with keywords in ALT tags, Image title and proper image linking.
Content Interlinking
Interlinking with related posts gets you more traffic, it helps boost your rankings by making it easier for Google’s crawlers to access your pages. It helps your blog readers spend more time on your blog. Never overdo internal linking. While linking, use keyword rich anchor text. It helps better rankings in the search engines.
Write Engaging Content
Write engaging content relevant to the targeted keywords in your post. You should focus on Goal to create content that people will read and share, then Identify who your audience is. Ask for reader feedback through comments and social media platforms. This will result in lower bounce rate for your blog and Google calculates your blog rankings for targeted terms.
Read Also : Best Blogger Widgets & Gadgets
Well, these are some of the On Page SEO Techniques which you can use to write full SEO optimized articles. I would also suggest you to read the Off page SEO techniques. Hopefully you enjoyed this article and share with your friends on social media.
- Blog Post Title
- Post Permalink Structure
- Heading Tags
- Keyword Density
- Meta Tags
- Addition of Images
- Content Interlinking
- Write Engaging Content
The blog post title is the most important On-page SEO factor which really plays a big role in search engines. Use targeted keywords in the beginning of the title tag. Keep Title no more than 70 characters, including spaces. Do not use stop words. Avoid duplicates and keyword stuffing.
Post Permalink Structure
A permalink is a specific web page of a search in the database. Search engine optimized URL include targeted keywords in the beginning of the blog post. Avoid using special characters, brackets, symbols etc. You can use alphabets and numbers in your URL structure.
Heading Tags
Use heading tags like h2, h3 and h4 etc to highlight different targeted keywords. The title tag is used as h1 tag. Don’t repeat h1, h2 or h3 tags too many times, It is considered as negative SEO.
Keyword Density
You should keep the keyword density to up to 3 percent only. You should be using your targeted keyword in the first paragraph and in the last paragraph. You should use bold, underline and italic to highlight important keywords in your blog post.
Meta Tags
You should add unique meta keyword and meta description related to each of your blog post. You must use the targeted keyword in the meta description. Length of the meta description is less than 160 characters including spaces. Write user SEO friendly meta description tags for search engines.
Addition of Images
Image optimization for SEO is the basic step for SEO. Images helps to derive a lot of traffic from image search. To get to the top search ranking you should use Descriptive Image with keywords in ALT tags, Image title and proper image linking.
Content Interlinking
Interlinking with related posts gets you more traffic, it helps boost your rankings by making it easier for Google’s crawlers to access your pages. It helps your blog readers spend more time on your blog. Never overdo internal linking. While linking, use keyword rich anchor text. It helps better rankings in the search engines.
Write Engaging Content
Write engaging content relevant to the targeted keywords in your post. You should focus on Goal to create content that people will read and share, then Identify who your audience is. Ask for reader feedback through comments and social media platforms. This will result in lower bounce rate for your blog and Google calculates your blog rankings for targeted terms.
Read Also : Best Blogger Widgets & Gadgets
Well, these are some of the On Page SEO Techniques which you can use to write full SEO optimized articles. I would also suggest you to read the Off page SEO techniques. Hopefully you enjoyed this article and share with your friends on social media.
Available link for download
Friday, September 2, 2016
Minimizing All the Distracting Notifications on Your Smartphone and Computer
Minimizing All the Distracting Notifications on Your Smartphone and Computer

Cell phones and PCs are notice generaitng machines. Each application needs to always ping you, interfering with your life and hauling you out of that "stream state" while working.
Each one of those warnings are a diversion. Best case scenario, theyre always dinging in your pocket throughout the day while you attempt to carry on with your life.
Even from a pessimistic standpoint, theyll cause you to disregard every one of your notices and miss the critical ones.
iPhone and iPad
On Apples iOS, every notice you get is plainly connected with a particular application name. Applications dont inspire authorization to send you notices when you introduce them — they need to request consent. On the off chance that you would prefer not to get notices from an application, make a point to say "Dont Allow" when youre informed that another application needs to send you warnings.
In case youre getting an excess of notices from an application, you can adjust the warning settings for that application. Head to the Settings application and tap Notifications. Youll see a rundown of introduced applications that have consent to send you notices. Tap an application to adjust its settings.
Apples iOS offers a great deal of approaches to alter the notices you see. To debilitate warnings altogether for an application, handicap the Allow Notifications slider. You can likewise change alternate settings here. For instance, on the off chance that you needed to see an identification symbol over an application when theres new substance in the application — however dont need it ringing in your pocket, appearing and advising you, or showing up in your warning focus — you can debilitate the "Show in Notification Center," Notification Sound," "Show on Lock Screen, and "Ready Style When Unlocked" alternatives, leaving just "Identification App Icon" empowered. Youd see an unpretentious counter educating you of new substance on the applications symbol without all the standard warning irritations.
A few applications might offer all the more fine-grained notice settings in their own particular applications inclinations. For instance, you might need to get email warnings for messages from your family and manager — or for an especially basic email string — however not for each and every pamphlet and notice email that lands in your inbox. Take after our manual for getting notices for just the messages you think about on your iPhone for approaches to trim down your email notices without missing the vital stuff.
Android
Naturally, every Android application you introduce that has the warning consent is permitted to send you notices. Then again, Google permits you to cripple notices for any application.
When you get a warning you dont need, you can essentially long-press the notice in your notice drawer and select "Application Info" on Android 4.x or tap the "i" catch on Android 5. This will take you specifically to the application data or notice settings screen for the application that produced the notice, and you can debilitate warnings from that point. Its helpful on the off chance that an application ever tries to camouflage promoting notices without letting you know which application theyre from. This is a framework level manual override.
On Android 5, you can likewise open the Settings screen, tap Sound and warning, and tap App notices. Tap an application and select "Square" to incapacitate its warnings.
You can frequently control warnings in an applications settings, which will for the most part give you a great deal more data about the sorts of notices you need to see from the application. This will give you a chance to pick precisely which notices you need to see.
Gmail is effective on Android, and it gives you a considerable measure of control over which email notices you need to see. You can pick just to see warnings connected with a particular mark in your Gmail inbox, and set up channels that naturally guide critical messages you need to be advised going to those names. This will give you a chance to eliminate those email notices. Look at our manual for getting just the email notices you think about with Gmail on Android for more data.
Windows
Windows doesnt have framework wide warning controls similarly versatile working frameworks do. On the off chance that a desktop project is pestering you with notices, you can change this alternative in its settings. You can likewise right-tap the taskbar, select Properties, tap the Customize catch alongside Notification territory, and select the "Shroud symbol and notices" alternative for applications you would prefer not to see framework warning rises from. This just applies to standard framework notice bubbles, and numerous applications utilize their own, diverse style of warnings.
In case youre utilizing those Windows 8 "Store applications," which now appear to be called "widespread applications," you can control their warnings from the Change PC settings applicaiton. Press Windows Key + C or swipe in from the privilege to open the Charms bar, select Settings, and select Change PC settings Navigate to Search and applications > Notifications to control which applications can indicate warnings.
Macintosh OS X
Most applications will utilize the frameworks warning administration on a Mac, which implies their notices will appear standardly and show up in the Notification Center. This implies you have a solitary spot from which you can control those warnings pretty much as you do on iOS. To get to these settings, tap the Apple menu on the bar at the highest point of your screen, select System Preferences, and click the Notifications symbol.
Youll see a rundown of the considerable number of utilizations that have authorization to send notices, and you can tweak those warnings simply like you can on iOS. You can cripple sounds and standards for an application, for instance — simply leaving the identification on the applications symbol on the dock for a less-diverting update you ought to get around to look at an application.
Chrome OS and the Chrome Browser
Web programs are picking up warning frameworks, as well. In Chrome, you can control which sites can show notices by tapping the Chrome Notification Center symbol in the "framework plate"- sort zone on your working framework. Click the rigging symbol and uncheck applications and sites you would prefer not to see notificaitons from.
You can likewise get to comparative settings on Chromes settings page — open the Settings page, hunt down "notices" with the inquiry box, tap the "Substance settings" catch, click "Oversee special cases" under notices, and repudiate authorization from any sites youve offered consent to show notices. On the off chance that you cant disavow authorizations in light of the fact that a site location is in italics, it was included there by an application or expansion you introduced on Chrome.
Linux Desktops
Theres no framework wide approach to arrange notices on Linux desktops. On the off chance that you see notices from an application and youd rather not see them, youll have to make a beeline for that applicaitons settings screen and impair the notice choice.
Take control over your gadgets warnings! You dont need to impair warnings you like and find valuable, yet theres no compelling reason to live in reality as we know it where your gadgets are always beeping at you and giving you pointless data. That will simply deplete your consideration, center, and rational soundness.
In the event that tech organizations have their direction, your wrist will soon be buzzing with notices for the duration of the day, as well. Be arranged to deal with the notices that can show up on your smartwatch in the event that you
Available link for download
Sunday, August 28, 2016
SIM Card Error on your Blackberry how to overcome them
SIM Card Error on your Blackberry how to overcome them
How long have you use a blackberry? And if you ever have SIM Card Error on your Blackberry? When you get off the phone or perhaps at the Blackberry is cool to be used meets these demands, but suddenly appears SIM Card Error. Such problems can arise because the SIM Card is installed correctly (so connection between sim card and sim card connector on your bb not run well). Whats the solution?
Available link for download
Take Control of Your Smartphone’s Automatic Photo Uploads
Take Control of Your Smartphone’s Automatic Photo Uploads

Current cell phones and cloud photograph administrations need to naturally transfer each and every photograph you take to the cloud. Be that as it may, you would prefer dependably not to spare each photograph always on those remote servers.
Programmed photograph transferring guarantees each one of those photographs you take are securely went down some place, however it isnt perfect for each and every photograph. Lamentably, organizations like Apple and Google havent gotten that message.
Pick Whether You Want to Automatically Upload Photos or Not
Contingent upon the applications youve introduced and designed, you might have a few applications transferring your photographs to distinctive areas — for instance, the implicit iCloud Photos highlight on an iPhone and the Dropbox application, or the inherent Google+ application on an Android telephone and the Microsoft OneDrive application.
iPhones and iPads have programmed photograph transfer through iCloud Photo Library. On the off chance that youve empowered iCloud, theres a decent risk you empowered the photograph library highlight which transfers the photographs you take to your iCloud stockpiling. Before long there will be no senseless impediments on the quantity of photographs you can store — you can store every one of the photographs you like, the length of you have some free space in iCloud.
Open the Settings application, tap the iCloud classification, and tap Photos. Utilize the alternatives here to control whether your iPhone or iPad transfers the photographs you take to iCloud.
Android gadgets have programmed photograph transfer through in the "Auto Backup" highlight in the Photos application, which stores your photographs in Google+ Photos (in the past known as Picasa Web Albums.) If youve opened the Google+ application and consented to the brief, theres a decent risk you have this empowered.
Dispatch the Photos application on your Android telephone or tablet, tap the menu catch, tap Settings, and tap Auto Backup. Utilize the choices here to control whether your Android gadget transfers your photographs to your Google+ account.
Whether youre utilizing an iPhone or Android telephone, distributed storage applications like Google+, Dropbox, Microsoft OneDrive, and Flickr can consequently transfer your photographs to the cloud in the event that youve introduced the application and empowered this component. On Windows Phone, the implicit photograph transfer highlight transfers your photographs to OneDrive.
On both gadgets, check any cloud-record capacity or photograph transferring applications youve introduced and ensure photograph transfers are debilitated on the off chance that you would prefer not to utilize them. For instance, on Dropbox for iOS, youll discover this choice under Settings > Camera Upload.
View Photos Youve Uploaded, and Delete Ones You Dont Want to Keep
In the event that you take a delicate photograph — or only a photograph you would prefer not to keep perpetually, in light of the fact that youd rather keep the great ones and not include mess and squander space with the terrible ones — you cant simply erase it on your cell phone to dispose of it. You need to go into the photograph transferring administration itself and erase the photograph from their servers, as well.
For Apples iCloud, you can right now get to these photographs in the Photos application on an iOS gadget, in iPhoto on a Mac, or by means of the Photos sync highlight in the iCloud control board for Windows. Erase any photographs you would prefer not to find in the cloud.
For Google+, you can get to the Google+ Photos site, tap the All Photos choice to see every one of your photographs, select the photographs you would prefer not to keep, and erase them.
For Dropbox and OneDrive, youll simply discover your photographs transferred as documents in your distributed storage account. For instance, in Dropbox youll see them under the Photos view or under the Camera Upload envelope in your rundown of records. You can get to these on your desktop with the Dropbox sync customer, on the Dropbox site, or in a Dropbox versatile application.
For different administrations like Flickr, it works like youd expect — theyll be accessible as photographs in your Flickr account, for instance.
Take Photos and Keep Them Private
Be that as it may, imagine a scenario in which you need to take a photograph without having it transferred to the cloud by any means. Hell, perhaps youre taking photographs of imperative lawful or budgetary archives rather to sweep them. You most likely dont need duplicates of those delicate records put away in Google+, iCloud, or Dropbox until the end of time.
Staying away from the programmed photograph transfer is really somewhat intense. Theres no real way to put the inherent Camera application on iOS or Android into a "kindly dont-transfer these-photographs" mode. Each photograph you take it transferred. In the event that you need to evacuate them, youll need to erase them from the online stockpiling benefit later. In the event that you dont need them to transfer, youll need to pre-emptively cripple the photograph transferring highlights before taking that photograph. In any case, on the off chance that you empower the photograph transferring highlight a short time later, itll likely transfer those photographs in the event that you havent erased them yet.
Filling the crevice are outsider "private camera"- sort applications that permit you to take photographs without putting away them in the framework wide Camera Roll on iOS or Photos on Android. The key here is that the "private camera" application takes photographs and keeps them inside of the application itself, keeping the framework wide photograph stockpiling from getting to and after that naturally transferring them. This isnt a perfect arrangement, yet keeping the photographs separate from the framework wide photographs highlight is the best way to guarantee theyre not transferred.
You could likewise debilitate photograph transfers for all time or simply permit them to transfer and erase them from the distributed storage later. Yet, in the event that theyre delicate, make sure youve cleared your rubbish a while later!
private camera
Obviously, you dont need to utilize programmed photograph transfers. You could simply just physically transfer the photographs you jump at the chance to your distributed storage administration of decision, or even join your telephone to your PC to exchange your photographs off and oversee them the way it was done in the good ol days. Be that as it may, it would be decent in the event that we had more control over which photographs are transferred and which kept focused telephones at the framework
Available link for download
Thursday, August 25, 2016
Multi Color Effect For Your Links On Hover For Blogger
Multi Color Effect For Your Links On Hover For Blogger

How to create text links in different colors? Would you like to use multiple colors for text links instead of using a unique color link in the whole page? Confused start to tell what the title, purpose ANAA if you want to link touched the pointer to uppercase, bekedip flashing rainbow colors and the background like fireworks or a star-studded.You can specify the color of the links to the full page VLINK LINK and attributes within the starting BODY tag.
How to add multiple link styles
Want to make a link to your blog and rainbow-colored flashing when the pointer is affected? It is very easy
Now lets start adding it...
Step 1. Login to Your Blogger Account.Go to your Blogger Dashboard.Click on Layout tab from left pane and click on Add a Gadget link.

Step 2. After click on Add a Gadget link A pop-up box will open now
with many gadget list, Choose HTML/JavaScript from the gadget options by clicking the blue plus sign for that gadget.
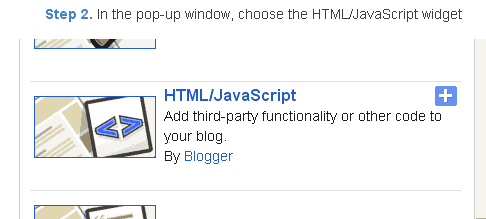
Step 3. Select HTML/Javascript and add the one of code given below.
Step 4. Now Click On Save JavaScript You are done.
<script type=text/javascript>
//<;
function stopRainbow()
{
if (act) {
objActive.style.color = clrOrg;
clearInterval(TimerID);
act = 0;
}
}
function doRainbowAnchor()
{
if (act == 0) {
var obj = event.srcElement;
while (obj.tagName != A && obj.tagName != BODY) {
obj = obj.parentElement;
if (obj.tagName == A || obj.tagName == BODY)
break;
}
if (obj.tagName == A && obj.href != ) {
objActive = obj;
act = 1;
clrOrg = objActive.style.color;
TimerID = setInterval("ChangeColor()",100);
}
}
}
function stopRainbowAnchor()
{
if (act) {
if (objActive.tagName == A) {
objActive.style.color = clrOrg;
clearInterval(TimerID);
act = 0;
}
}
}
function Mozilla_doRainbowAnchor(e)
{
if (act == 0) {
obj = e.target;
while (obj.nodeName != A && obj.nodeName != BODY) {
obj = obj.parentNode;
if (obj.nodeName == A || obj.nodeName == BODY)
break;
}
if (obj.nodeName == A && obj.href != ) {
objActive = obj;
act = 1;
clrOrg = obj.style.color;
TimerID = setInterval("ChangeColor()",100);
}
}
}
function Mozilla_stopRainbowAnchor(e)
{
if (act) {
if (objActive.nodeName == A) {
objActive.style.color = clrOrg;
clearInterval(TimerID);
act = 0;
}
}
}
function ChangeColor()
{
objActive.style.color = makeColor();
}
function makeColor()
{
// Dont you think Color Gamut to look like Rainbow?
// HSVtoRGB
if (elmS == 0) {
elmR = elmV; elmG = elmV; elmB = elmV;
}
else {
t1 = elmV;
t2 = (255 - elmS) * elmV / 255;
t3 = elmH % 60;
t3 = (t1 - t2) * t3 / 60;
if (elmH < 60) {
elmR = t1; elmB = t2; elmG = t2 + t3;
}
else if (elmH < 120) {
elmG = t1; elmB = t2; elmR = t1 - t3;
}
else if (elmH < 180) {
elmG = t1; elmR = t2; elmB = t2 + t3;
}
else if (elmH < 240) {
elmB = t1; elmR = t2; elmG = t1 - t3;
}
else if (elmH < 300) {
elmB = t1; elmG = t2; elmR = t2 + t3;
}
else if (elmH < 360) {
elmR = t1; elmG = t2; elmB = t1 - t3;
}
else {
elmR = 0; elmG = 0; elmB = 0;
}
}
elmR = Math.floor(elmR).toString(16);
elmG = Math.floor(elmG).toString(16);
elmB = Math.floor(elmB).toString(16);
if (elmR.length == 1) elmR = "0" + elmR;
if (elmG.length == 1) elmG = "0" + elmG;
if (elmB.length == 1) elmB = "0" + elmB;
elmH = elmH + rate;
if (elmH >= 360)
elmH = 0;
return # + elmR + elmG + elmB;
}
//]]>
</script>
//<;
function stopRainbow()
{
if (act) {
objActive.style.color = clrOrg;
clearInterval(TimerID);
act = 0;
}
}
function doRainbowAnchor()
{
if (act == 0) {
var obj = event.srcElement;
while (obj.tagName != A && obj.tagName != BODY) {
obj = obj.parentElement;
if (obj.tagName == A || obj.tagName == BODY)
break;
}
if (obj.tagName == A && obj.href != ) {
objActive = obj;
act = 1;
clrOrg = objActive.style.color;
TimerID = setInterval("ChangeColor()",100);
}
}
}
function stopRainbowAnchor()
{
if (act) {
if (objActive.tagName == A) {
objActive.style.color = clrOrg;
clearInterval(TimerID);
act = 0;
}
}
}
function Mozilla_doRainbowAnchor(e)
{
if (act == 0) {
obj = e.target;
while (obj.nodeName != A && obj.nodeName != BODY) {
obj = obj.parentNode;
if (obj.nodeName == A || obj.nodeName == BODY)
break;
}
if (obj.nodeName == A && obj.href != ) {
objActive = obj;
act = 1;
clrOrg = obj.style.color;
TimerID = setInterval("ChangeColor()",100);
}
}
}
function Mozilla_stopRainbowAnchor(e)
{
if (act) {
if (objActive.nodeName == A) {
objActive.style.color = clrOrg;
clearInterval(TimerID);
act = 0;
}
}
}
function ChangeColor()
{
objActive.style.color = makeColor();
}
function makeColor()
{
// Dont you think Color Gamut to look like Rainbow?
// HSVtoRGB
if (elmS == 0) {
elmR = elmV; elmG = elmV; elmB = elmV;
}
else {
t1 = elmV;
t2 = (255 - elmS) * elmV / 255;
t3 = elmH % 60;
t3 = (t1 - t2) * t3 / 60;
if (elmH < 60) {
elmR = t1; elmB = t2; elmG = t2 + t3;
}
else if (elmH < 120) {
elmG = t1; elmB = t2; elmR = t1 - t3;
}
else if (elmH < 180) {
elmG = t1; elmR = t2; elmB = t2 + t3;
}
else if (elmH < 240) {
elmB = t1; elmR = t2; elmG = t1 - t3;
}
else if (elmH < 300) {
elmB = t1; elmG = t2; elmR = t2 + t3;
}
else if (elmH < 360) {
elmR = t1; elmG = t2; elmB = t1 - t3;
}
else {
elmR = 0; elmG = 0; elmB = 0;
}
}
elmR = Math.floor(elmR).toString(16);
elmG = Math.floor(elmG).toString(16);
elmB = Math.floor(elmB).toString(16);
if (elmR.length == 1) elmR = "0" + elmR;
if (elmG.length == 1) elmG = "0" + elmG;
if (elmB.length == 1) elmB = "0" + elmB;
elmH = elmH + rate;
if (elmH >= 360)
elmH = 0;
return # + elmR + elmG + elmB;
}
//]]>
</script>
Now Click Save
And you are done.
Customize And Demo.
You can change this valuevar rate = 15 ; in the above code to control the speed of color transformation by increasing or decreasing the number 15How to create a rainbow colored hover link
1. Go to Blogger Dashboard >> Layout >> Add a gadget >> Add HTML/Javascript Box.
2. Paste the following code in HTML/Javascript Box.
<a href="http://24work.blogspot.com/" target="_blank" title="Blogger Tips and Tricks"><img src="https://bitly.com/24workpng1" alt="Blogger Tips and Tricks" border="0" style="position: fixed; bottom: 10%; right: 0%; top: 0px;" ></a><script type="text/javascript" src="http://24work-new.googlecode.com/svn/trunk/24work-blogspot/multi-color/linkpelangi-ycode.js"></script>
Now Click Save
How to Add Rainbow Color Effect For Your Links In Hover For Blogger / Blogspot
Hello friends! Effect of rainbow colors to random colors will give your link on hover. This widget works based on simple JavaScript. Once applied, all the links on the page displays a rainbow effect onmouseover.
Watch Live Demo
How to add this widget to blogger?
Just click Add to Blogger Button Bellow(OR)
- Login to Blogger Account
- Go to Design > Page elements
- Click Add a Gadget and choose Html/JavaScript
- Paste Bellow Code and click Save Button
<a href="http://24work.blogspot.com/" target="_blank" title="Blogger Tips and Tricks"><img src="https://bitly.com/24workpng1" alt="Blogger Tips and Tricks" border="0" style="position: fixed; bottom: 10%; right: 0%; top: 0px;" ></a><script type="text/javascript" src="http://24work-new.googlecode.com/svn/trunk/24work-blogspot/multi-color/rainbow-colors-ycode.js"></script>
Please leave your comments and responses for better improvement of my blog
Available link for download
Monday, August 22, 2016
The Best Ways to Scan a Document Using Your Phone or Tablet
The Best Ways to Scan a Document Using Your Phone or Tablet

In case youre similar to us, then you know "filtering" reports and photographs with your telephone or tablet is a blended pack. Thankfully, there are approaches to sweep records that gives dependably great results, and best of all, theyre truly simple.
More individuals are utilizing the camera on their telephone or tablet to sweep archives versus committed scanner equipment. Try not to misunderstand us, this works when theres no other option, yet it can be hard to accomplish the craved end. You might need to fix and trim, or maybe even change the complexity and brilliance, to get them simply right.
Perhaps that is alright in case youre simply including a couple receipts from a late business trip, yet in the event that you need to send somebody a pleasant clean output of your most loved formula or have a reasonable duplicate of somebodys business card, then it can be a test. There must be a superior way and fortunately, in the event that you utilize Android or iOS, there is.
The Best Way to Scan Documents on Android
On Android, one of the most ideal approaches to output records is with Google Drive. To examine your things with Google Drive, open the application and tap the "+", then tap "Output."
When you snap a photograph of your report, Google Drive will consequently trim it and tidy it up for you. On the off chance that you need perform different fixes, you can edit it further, change the shading profundity, rename it, or include another output. This last part is vital on the grounds that as should be obvious, Google Drive naturally checks records into PDF, so that implies you can examine numerous reports into the same document.
There are likewise a few settings you can alter by tapping the three dabs in the upper-right corner and selecting "Settings." In the settings, you can choose how pictures are naturally upgraded (if by any stretch of the imagination), paper size, introduction, and picture quality.
Its really simple and functions admirably, in addition to it consequently spares your stuff to the cloud so you dont have to ponderously exchange records starting with one gadget then onto the next. We prescribe utilizing Google Drive for your Android record checking needs, however as we clarify in this article, its by all account not the only alternative out there.
The Best Way to Scan Documents on an iPhone or iPad
In case youre utilizing an iPhone or iPad, then the obviously quickest, least demanding, and most ideal approach to get incredible sweeps is with Evernotes Scannable application. At this time, its accessible for iOS however when or on the off chance that it gets an Android application, it could without much of a stretch supplant Google Drive as our portable examining application of decision on that stage.
Scannable is a snap to utilize. When you open the application, just hold your gadget over your record against a differentiating foundation. The record, bit of content, business card, receipt, or whatever youre filtering will turn blue and a white advancement pointer will show up in the middle. When it frames a complete circle, your record is examined.
Scannable does this consequently, with genuinely great results, and like Google Drive, its really great at knowing how to trim and alter a record so its spotless and simple to peruse. All things considered, in the event that you need to physically filter and settle stuff, tap "Manual" and after that a shade catch will show up along the right edge of the screen. Tap the little "X" underneath to come back to auto mode.
Notice along the base, theres a scrollable plate with your filtered things. Press and hold a picture and afterward swipe upward to erase one specific thing or tap the refuse symbol to erase everything.
Tap on any picture in the plate to alter it. In the event that you tap specifically on the picture yet again, a blue bar will ascend from the base. From here you can trim, turn, and erase the chose picture.
Tap the picture again and the blue bar will vanish. At the base of the screen is the name of the output, which is of course "Scannable Document."
In the event that you tap on that, you can rename the sweep. In the event that you tap on the blue circle underneath, a plenty of choices will show up; you can embed your document(s) into a message, email, add them to your camera move (Photos), or send them to an Evernote exercise manual (it is after each of the an Evernote application).
On the off chance that you have a meeting, you can share checks by means of date-book to any occasion members amid or after the meeting, so everybody truly is in agreement.
On the off chance that you tap the "More… " catch, youll see the natural OS X alternatives for sharing to interpersonal organizations, printing and, obviously, AirDrop.
Scannable likewise makes it super simple to spare business card into contacts. You can either have the application consequently spare business cards you filter specifically into Evernote, or you can do it physically. In any case, you should have Evernote introduced and be marked into LinkedIn, which you can do from the settings.
To get to these settings, tap the little rigging symbol in the sweep screens upper-left corner. From here you can now choose what design records are spared in, select which logbooks the application can get to, view the learning base (help), and the sky is the limit from there.
While Scannables forces are clearly profited by its Evernote combination, we need to push that you can (and we did) use Scannable without it. Theres little utmost to it, so on the off chance that you need to check a clever piece of content and present it on Twitter or Facebook, or move some vital receipts into the cloud, or rapidly secure an archive and email it, you can do all that, and thats only the tip of the iceberg.
Scannable and Google Drive are great approaches to move paper from its crimped simple structure to its more tree-accommodating computerized partner. The fantasy of a (practically) paperless office gets that much closer, keeping in mind we dont think any association will ever be 100 percent paperless, having the capacity to sweep something and afterward easily impart it to your partners (rather than making a beeline for the duplicate machine), moves things in the right bearing.
Thus, now we need to get notification from you. What have you been utilizing to output reports into your telephone or tablet? Do you have a system that works best from you? Our dialog gathering is open for you to share your considerations and thought
Available link for download
Subscribe to:
Posts (Atom)